AI Creative OS
01Download the three skills02Glass HUD03Behind the Head04Kinetic Doc05Raw vs Edit06Point & Pop07Archive Collage08Install them once09Apply a style to a clip10Mix them in one reel

Six Editing Styles as Claude Code Skills

Same take, different edits, and I never opened an editor. The styles from the reels as ready skill files: Glass HUD, Behind the Head, Kinetic Doc, Raw vs Edit, Point & Pop, Archive Collage. Install them, point Claude Code at a clip, say which style.
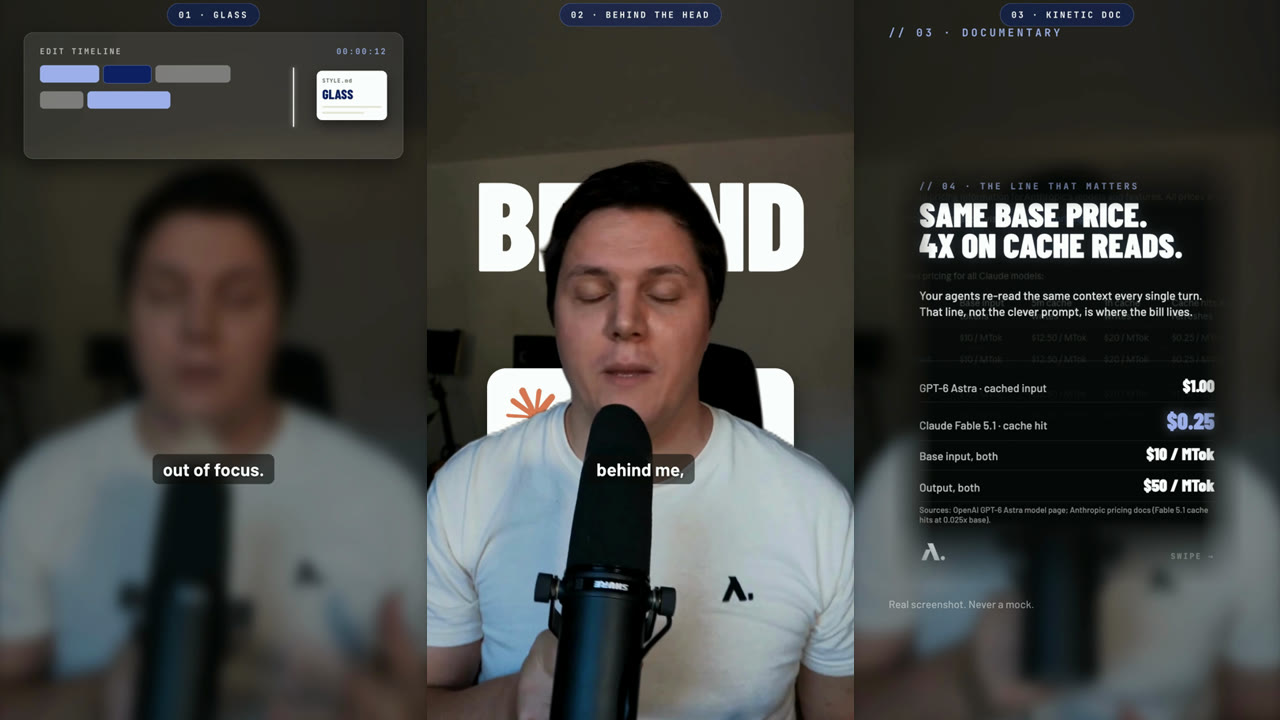
Glass HUD, Behind the Head and Kinetic Doc on the same talking-head take
What you'll make
Build it step by stepInteractive · ~5 min · with Z’s build guideStart →
0100 · GET THE FILES
Download the three skills
One zip with all six, or each on its own, from the download buttons at the top of this page. Every skill is a folder: SKILL.md (what it does and how to apply it), FRAME.md (the design spec: colours, type, motion rules), overlays/ (the working component) and a showcase page with real frames. Unzip into ~/.claude/skills/.
0201 · GLOSSY ON BLUR
Glass HUD
Frosted-glass panels, chips and file cards float in the band above your face. The rule that makes it feel physical: when glass is up, the room goes soft. The footage blurs to 16px and dims to 62% over 0.45s, then snaps back sharp when the panel leaves. Mono caps labels, one navy accent, white at low alpha for everything else. Use it for tool walkthroughs and 'here is what the system does' beats.
0302 · THE DEPTH TRICK
Behind the Head
Giant type and white logo tiles rise up behind you, occluded by a true matte of your head and shoulders. Two copies of the same take: the full footage underneath, a cutout of you on top, and the graphic sandwiched between. The cutout comes from one local command, npx hyperframes remove-background, on a 2 to 5 second segment. The graphic has to overlap you or the trick is invisible.
0403 · VOX GRAMMAR
Kinetic Doc
Huge condensed caps slam in on the spoken word, a navy marker bar draws under the word that matters, and the proof is a real screenshot on a rounded card with faded edges pushing in slowly. Cuts are hard and land on word starts. One slam per cue, never every word. Black and white, navy as the only accent, no music.
0504 · THE PROOF SPLIT
Raw vs Edit
The raw take and the finished edit of the same footage, stacked as two 16:9 cards on an off-white canvas. Green-dot Edited by over red-dot Raw Video. The whole edit happens inside the top card: punch-ins on the words, captions, an odometer counter, a platform node graph, a metric card, the keyword pill. The bottom card never changes, so every overlay reads as evidence.
0605 · THE LIST
Point & Pop
A pinned white title pill and two slots above your shoulders that snap in on the spoken keyword and the pointing finger: a navy badge on the left, a real screenshot card on the right. Opaque, one soft shadow, swapped hard every 2 to 3 seconds with a pop. Built for tool lists, agent lists and 'three things' reels.
0706 · THE EVIDENCE WALL
Archive Collage
A story told with receipts. Square real screenshots or photos hard-cut onto the wall above you on the nouns, white-framed with a deep shadow and a slow drift, one at a time. A serif title types itself at the start, lowercase 1 to 3 word captions at the chest, a typewriter under the title and a pop on every image. Built for 'things I built', 'people who taught me', timelines.
0807 · SETUP · 10 MIN
Install them once
You need Node 22+, FFmpeg, and a HyperFrames project (npx hyperframes init my-reel). Unzip the skills into ~/.claude/skills/ so each is its own folder (glass-hud, behind-head, kinetic-doc). Restart Claude Code so it loads them. Copy the FRAME.md of the style you want into the project as lowercase frame.md; every HyperFrames workflow reads it as the brand layer.
0908 · THE 30-MINUTE TEST
Apply a style to a clip
Drop one talking-head clip into the project's assets/, transcribe it (npx hyperframes transcribe gives word timestamps), then ask Claude Code with the prompt below. It places the overlays on the spoken cues, runs npx hyperframes check, and renders. Your first test: one clip, one style, three overlay beats. If it takes longer than 30 minutes, the clip is too long; cut it to 25 seconds.
1009 · WHAT I DO
Mix them in one reel
The reel you came from uses all three on the same take: glass for the software beat, behind-the-head for the logo beat, kinetic doc for the proof beat. The order that reads best: glass first (it teaches the viewer the blur), depth trick second (the surprise), kinetic last (the punch before the CTA). Captions: 2 to 4 words at chest height on a dark pill, off during slam beats.
The prompt · paste into Claude Code inside your HyperFrames project
Package assets/take.mp4 as a 9:16 talking-head reel using my editing-style skills.
1. Transcribe it with word timestamps and group captions into 2-4 word chunks at chest height on a dark pill.
2. Apply glass-hud on the line where I describe the tool: one panel above my face, rack focus on the footage while it is up.
3. Apply behind-head on the line where I name the tools: giant word plus three logo tiles rising behind me, matte from that 3-second segment.
4. Apply kinetic-doc on the proof line: two slams, navy marker under the key word, then the screenshot in assets/receipt.png as the receipt.
5. Keep everything else sharp and clean. Run npx hyperframes check until 0 errors, show me snapshots at each beat, then render high quality.
Want this running for you?
Build it step by step inside AI Creative OS, with me in the thread.
Implement this today →
Zdeno Mucina
Not ready for that?
Drop your email and 3 more guides open in the Library, free.